

If you installed or upgraded an irrigation system this past spring — maybe after reading our guide to starting up your irrigation system in June — you’re now facing the other half of the annual cycle: shutting it down correctly before New England’s first hard freeze. Skipping this step, or doing it halfway, is one of the most expensive mistakes a homeowner in Walpole, MA can make with an otherwise well-maintained landscape.
Water left sitting in irrigation pipes over a Massachusetts winter doesn’t just sit there quietly. It freezes, expands, and cracks fittings, valves, and backflow devices — damage you won’t discover until you turn the system back on next spring, usually at the worst possible moment.
Why Winterizing Irrigation Systems Matters in New England
Walpole sits solidly in a climate zone where ground temperatures regularly drop below freezing from December through March, and sometimes earlier. Unlike warmer regions where a light frost might not reach buried pipe, our frost line can extend 36 to 48 inches deep in a hard winter. Any residual water trapped in a pipe, valve, or sprinkler head at that depth has nowhere to expand except outward — and PVC pipe, brass fittings, and rubber diaphragms all lose that fight.
[Certain] The core reason irrigation winterization exists: water expands roughly 9% in volume when it freezes. In a sealed, rigid pipe, that expansion has to go somewhere, and “somewhere” usually means a hairline crack that won’t show a leak until the system is pressurized again months later.
When Should You Winterize Your Irrigation System?
Timing is a common question we get from Walpole homeowners, and the honest answer is: before the first hard freeze, not on a fixed calendar date. In practice, that means:
- Early to mid-October for most of Norfolk County, including Walpole
- Earlier if the extended forecast shows an unusually early cold snap
- Never later than the first night temperatures are forecast to drop below 32°F for several consecutive hours
Waiting until you’ve already had a frost is a gamble. Even one hard freeze on standing water in exposed backflow devices can crack a $200–$400 component overnight.
The Winterization Process, Step by Step
Homeowners often ask whether this is something they can do themselves with a shop vac, and the short answer is: partially, but not completely, and not safely if you don’t have a compressor. Here’s what a proper professional winterization actually involves.
1. Shutting Off the Water Supply
The first step is isolating the irrigation system from the main water line. This sounds simple, but in older Walpole homes with irrigation systems installed 15–20 years ago, the shutoff valve is sometimes buried, corroded, or mislabeled. Finding and confirming the correct valve is where most DIY attempts go wrong first.
2. Draining the System
There are three standard drainage methods:
- Manual drain valves — lowest cost, but requires physically opening valves at the lowest points in the system and relies on gravity, which rarely removes 100% of the water.
- Auto-drain valves — built into some systems, these open automatically once pressure drops, but they can fail or clog with sediment over time.
- Blow-out method (compressed air) — the industry standard, and the only method that reliably clears water from every zone, including uphill runs and sprinkler heads. This requires a commercial-grade air compressor (not a shop vac) rated for the system’s pipe size — using the wrong PSI can blow apart fittings or, worse, cause injury.
3. Blowing Out Each Zone
A technician runs compressed air through each zone individually, watching each sprinkler head until it mists rather than sprays water, then closing that zone before moving to the next. This has to be done zone by zone, not all at once, and at a controlled PSI — typically 50–80 PSI depending on pipe material, with lower pressure for older PVC systems.
4. Draining and Insulating the Backflow Preventer
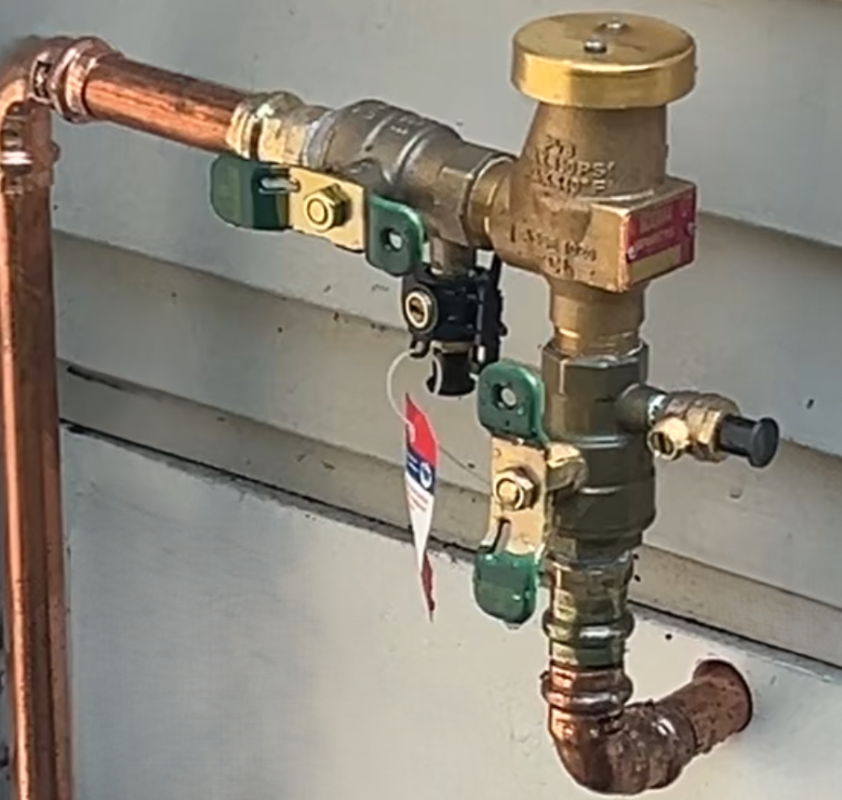
The backflow preventer is the single most expensive component to lose to freeze damage, and it’s also the most exposed — usually mounted above ground precisely so it can be inspected. After draining it manually, wrapping it with an insulated cover for the winter is a five-minute step that prevents a repair that otherwise runs $300–$600.
5. Programming the Controller for Winter Shutdown
The controller itself should be set to “off” or “rain mode” rather than simply unplugged, and if it’s a smart controller, this is a good time to check for a firmware update before it sits idle for five months.
What Happens If You Skip Winterization?
[Likely, based on typical industry repair patterns] The most common spring repair calls we get in Walpole are directly traceable to skipped or incomplete winterization the previous fall. Cracked backflow preventers, split PVC lines under driveways, and blown solenoid valves are almost always winter freeze damage that surfaces the moment the system is pressurized again in April or May. The repair cost is routinely 3 to 5 times what a professional winterization service costs — and that’s before accounting for the water damage a cracked line can cause to a foundation or basement if it’s leaking underground all winter without anyone noticing.
Can You Winterize an Irrigation System Yourself?
You can perform partial winterization — shutting off the water and opening manual drains — with basic tools. What you generally cannot safely do without professional equipment is the compressed-air blow-out, which is the step that actually clears water from sprinkler heads and elevated pipe runs. Renting a compressor is possible, but sizing it correctly and running it at the right PSI for your specific pipe material is where most DIY winterizations leave residual water behind — meaning you’ve done the work but not gotten the protection.
Winterizing Irrigation Systems: Frequently Asked Questions
How much does it cost to winterize an irrigation system in Walpole, MA? Professional winterization typically runs $75–$150 for a standard residential system, depending on the number of zones and accessibility of the backflow preventer.
What temperature triggers the need to winterize? Any forecast of sustained temperatures below 32°F should trigger winterization if it hasn’t already been done. In Walpole, that’s typically early-to-mid October.
Is winterizing the same as blowing out sprinklers? Blowing out sprinklers (the compressed-air method) is the most thorough part of winterization, but full winterization also includes shutting off the main supply, draining the backflow preventer, and setting the controller to winter mode.
Can I use a shop vac instead of a compressor? A shop vac does not generate enough consistent pressure to clear water from every zone, particularly uphill runs and elevated sprinkler heads. It’s better than nothing, but it isn’t equivalent to a professional blow-out.
When should I schedule spring start-up? Spring start-up should happen after the last expected hard frost, typically mid-to-late April in Walpole — the natural counterpart to this fall service, and the topic of our June guide.
Protect Your System Before the First Freeze
Winterizing your irrigation system isn’t a maintenance luxury in a Walpole winter — it’s the difference between a five-minute spring start-up and an expensive repair bill. If your system hasn’t been serviced yet this fall, contact Land Design Associates to schedule your winterization before the first freeze hits.
Start with a design consultation:
https://landdesignassociates.com/design-build-form/
Or explore our work here:
https://landdesignassociates.com/featured-projects/